
Mermaid Scales 🧜♀️
Join me to create this magical and shimmering piece of mermaid art! Using a stencil, acrylic paint, Dragonfly Glaze paint, and crushed glass, you'll create an iridescent masterpiece that glows with color and texture. Follow along with this step-by-step tutorial to bring your own artwork to life!
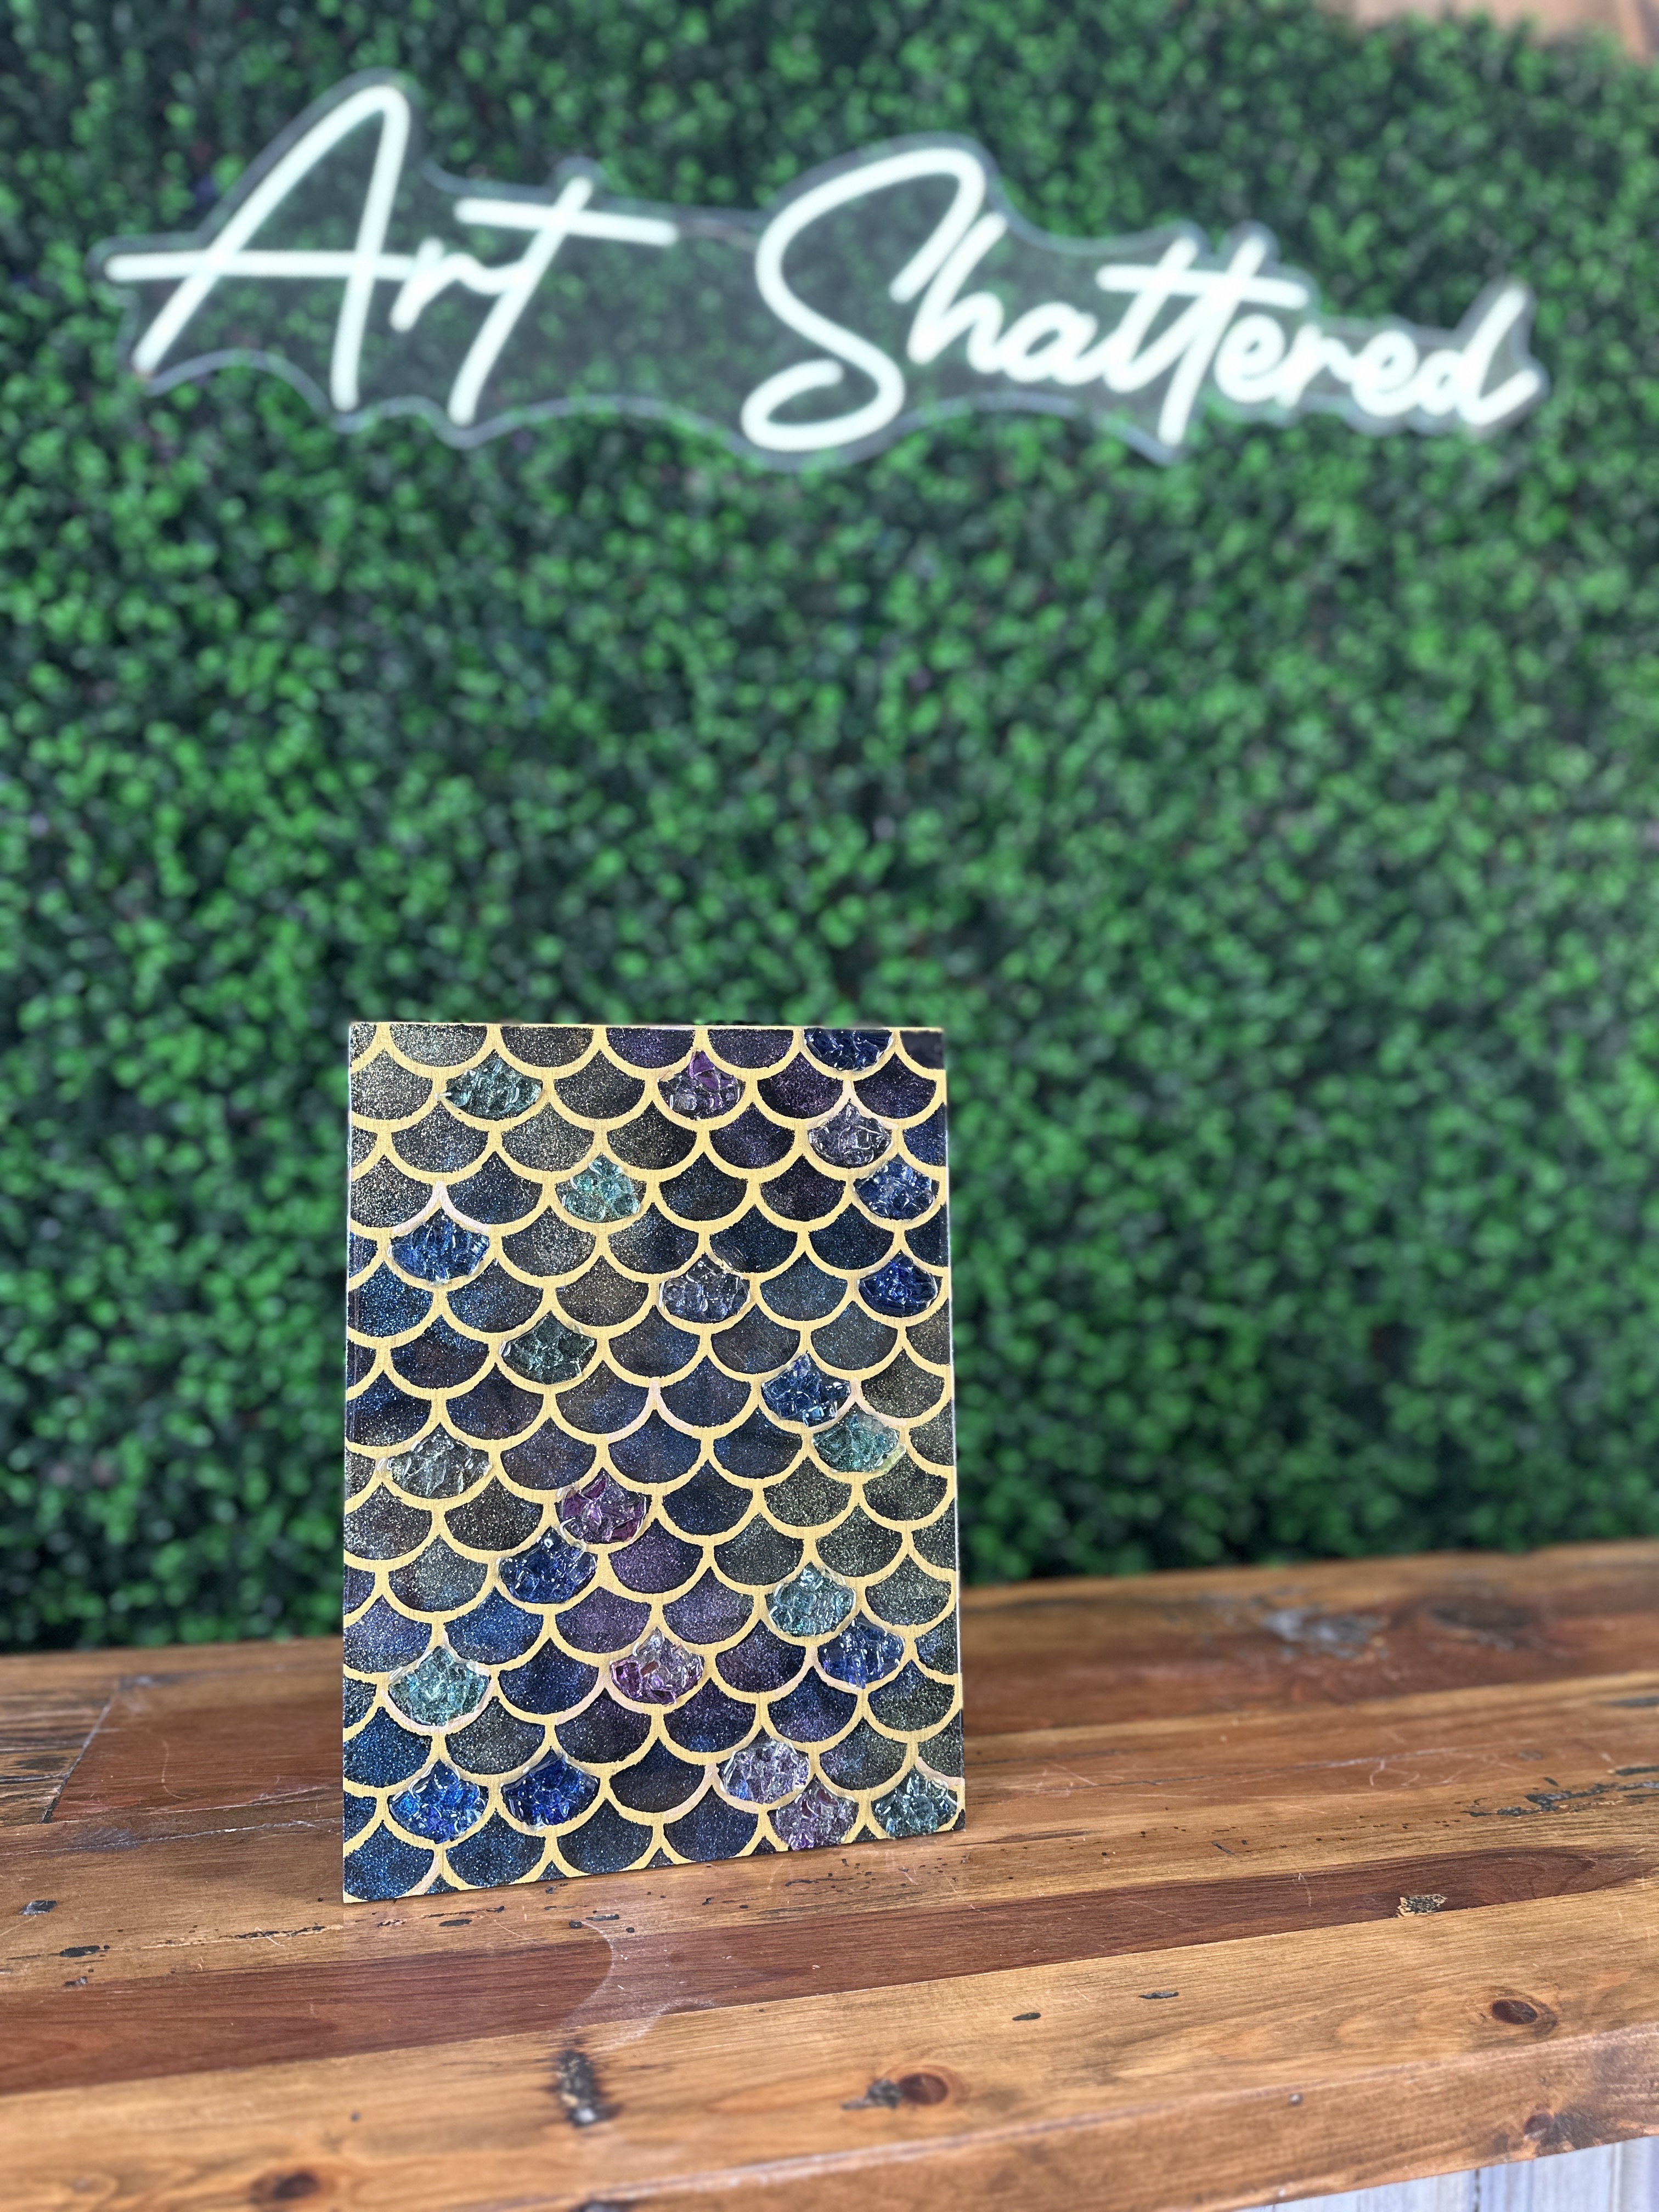
I am using a wooden 9xa2 canvas for this art project. Start by painting the entire canvas (along with the edges) with one coat of black acrylic paint. Once dry, apply two coats of gold paint over the black. This gold layer will show through the stencil design. Let the paint dry completely before moving on to the stenciling process.
Secure your mermaid scale stencil onto the canvas using painter’s tape. Since the stencil is slightly larger than the canvas, you’ll need to stencil in sections.
Using a dauber or stencil brush, lightly dab black acrylic paint over the stencil. Be careful not to overload the brush - offloading excess paint onto a paper towel will help prevent seepage under the s...
Coastal Pumpkin 🌊
Let's blend beachy vibes with autumn charm in this unique mixed-media art project! We’ll start by creating a decoupage background with a beach scene, then layer in a beautiful pumpkin, finishing with a touch of sparkle using glass accents and shells. This step-by-step guide will walk you through each stage, bringing coastal and seasonal style to your canvas.

For this art piece, we’ll be crafting a beachy decoupage background using a scenic napkin. Start by trimming the napkin to fit your canvas, then separate the layers until only the top printed layer remains. Brush a layer of Mod Podge onto the canvas, place the napkin on top, and gently smooth it down with your hands to remove any wrinkles. Once it’s secure, apply another coat of Mod Podge over the top to seal it. Tear away any extra napkin from the edges, then use a heat tool to speed up drying.

Grab your tracer, tape it to your canvas, place graphite paper underneath, and trace the pumpkin with a stylus.
Instead of tracing, ...
Destin Metallic Pumpkin 🎃 🌊
I'm thrilled to be joined by two incredible guest artists - Christie Hawkins from The Social Easel and Kasey Hope with P'zazz Art Studio. Together, we're crafting textured metallic pumpkins on a 6x6 canvas, perfect for adding a festive touch to your fall decor. Not only are these pumpkins adorable and super easy to make, but I'm also giving mine a unique twist by incorporating beachy elements like mini shells, starfish, Starfire glass, and seed beads.

We are going to use modeling paint to create a textured pumpkin! Load a palette knife with modeling paste, make a large circle, and then create sections on each side in a "parenthesis" shape. Add your stem as well. Let dry for an hour or two.
I'll paint my pumpkin with Metallic Peal paint and blend in Metallic Ice Blue. I'll paint my background with Metallic Rose Shimmer and use dark pink to go around my pumpkin to create a shadow. I'll also paint the stem with Metallic Gold.
Take the flat side of your brush and dip it into the Ros...
Summer Snowman ⛄️
Join me for a fun Christmas in July glass and resin art tutorial! We’re making a cute summer snowman on the beach using acrylic paint, mini starfish, starfire glass, small shells, and beads. This easy project is perfect for adding a touch of holiday cheer to your summer decor!

We are going to start by painting our background with a sandy beach on the bottom and a night sky on the top. Make a tick mark about 3 inches from the bottom. Paint this bottom area with Bleached Sand paint. Dry with a heat tool.
Next, cover this with painter's tape and we'll work on the top portion of the canvas. Paint a circular swirl of white paint in the center of your canvas. Blend in Bleached Sand, making the circle bigger. I'll do the same thing with Midnight Garden and Deep Midnight Blue. Swirl in some more white and Bleached Sand to bring it all together. Dry with a heat tool and remove the painter's tape.
Add a second coat of Bleached Sand to your bottom area, blending in some white paint as well. ...
Christmas on the Beach 🌊🎄

I'm going to start by dividing my canvas into thirds - the sky, water, and sand. I'll use Sugared Peach to paint the bottom third of my canvas, using the flat edge of a large brush from left to right. Don't cover it completely, but leave some empty areas of your canvas for other colors. Grab some Oyster White and white paint and add those two colors in too. I'll also barely swish in gray paint on the two sides.
Next, we'll work on the sky. Turn your canvas upside down to make this easier! I'll add Spa Blue, white, and gray paint using the same technique. T...
Beach with Shells 🏝️
Let's create some abstract beach art with this beginner-friendly tutorial! Using a combination of acrylic bubbles, glass chips, blue round flat gems, and shells, you'll create a stunning beach scene that's perfect for summer. The background is easily painted with a palette knife, requiring no tracer. Get ready to add some coastal charm to your home with this unique and fun 8x10 art piece!

We are going to start by painting our background with several different colors of blue (Shoreline, Bahama Blue, and Desert Turquoise) along with white. I am using a palette knife, dipping the back into my paint colors, and lightly swiping the color onto my canvas from left to right in a horizontal motion. I'll also paint the sides of my canvas too. Dry with a heat tool.

Now let's add our glass! I am going to start by adding Clear Classic glass, Caribbean Blue glass, and Light Azuria Reflective glass. I'll also stick in a couple of blue round flat gems. glass chips, and shells. I'm concentrating ...
Beach Abstract with Modeling Paste 🌊
This stunning beach abstract is both fun and beginner-friendly! It requires minimal painting, no tracer, and the best part is, you can't mess it up! We'll be using modeling paste, glass, acrylic bubbles, and resin to bring the tranquil beauty of the beach to your artwork.

I am using an 8x8 wood canvas from Hobby Lobby. I will start by using painter's tape to split my surface in half. I'll paint the top area's background and sides with Tropical Blue acrylic paint. Dry with a heat tool and then add your painter's tape back so that you can add color to the bottom half. I will paint the bottom background and sides with black acrylic paint. Dry with a heat tool again.

Use the back of your palette knife to apply modeling paste to the blue area of your wooden canvas. Apply it quickly and you do not need to be perfect about it. While the paste is still wet, dip your palette knife in Slate Gray paint and barely swipe it across the modeling paste. I'll use this same technique to add white...
Starfish Beach Art 🌊
I found a beautiful dusty rose starfish ornament at Hobby Lobby and I'm creating a beach art piece with lots of shells, driftwood, glass, and seed beads. This one has no tracer and minimal painting (just the background!), so you can easily recreate this and use whatever you have in your stash!

We are working with an 8x16 canvas. Start by painting your background with white paint. Next, I am going to blend in some Cactus Flower pink paint. Use your brush flat and apply the color from side to side. Dry with a heat tool.
I will use the flat side of my paintbrush and apply more white paint on top, just lightly swiping the brush from side to side to create more dimension. Dry again.

Now, let's add all of our glass and goodies! I am going to add about half of a bag of Rose Gold glass. I'll situate my starfish towards the right side of my canvas in the glass. I'll fill in any spots with Starfire glass. Then, I'll arrange my shells, piece of driftwood, and a few pearl beads among my gl...
Seaglass Beach 🌊
I am dreaming of the beach, so we are going to squeeze in one last beach art piece before the summer is over! We are working with an 8x8 canvas, and this art project has minimal painting and lots of glass goodies. We'll be adding sea glass in blues and greens, tinted seashells, Caribbean Blue and Solex glass, flat gems, seed beads, bubbles, and more!
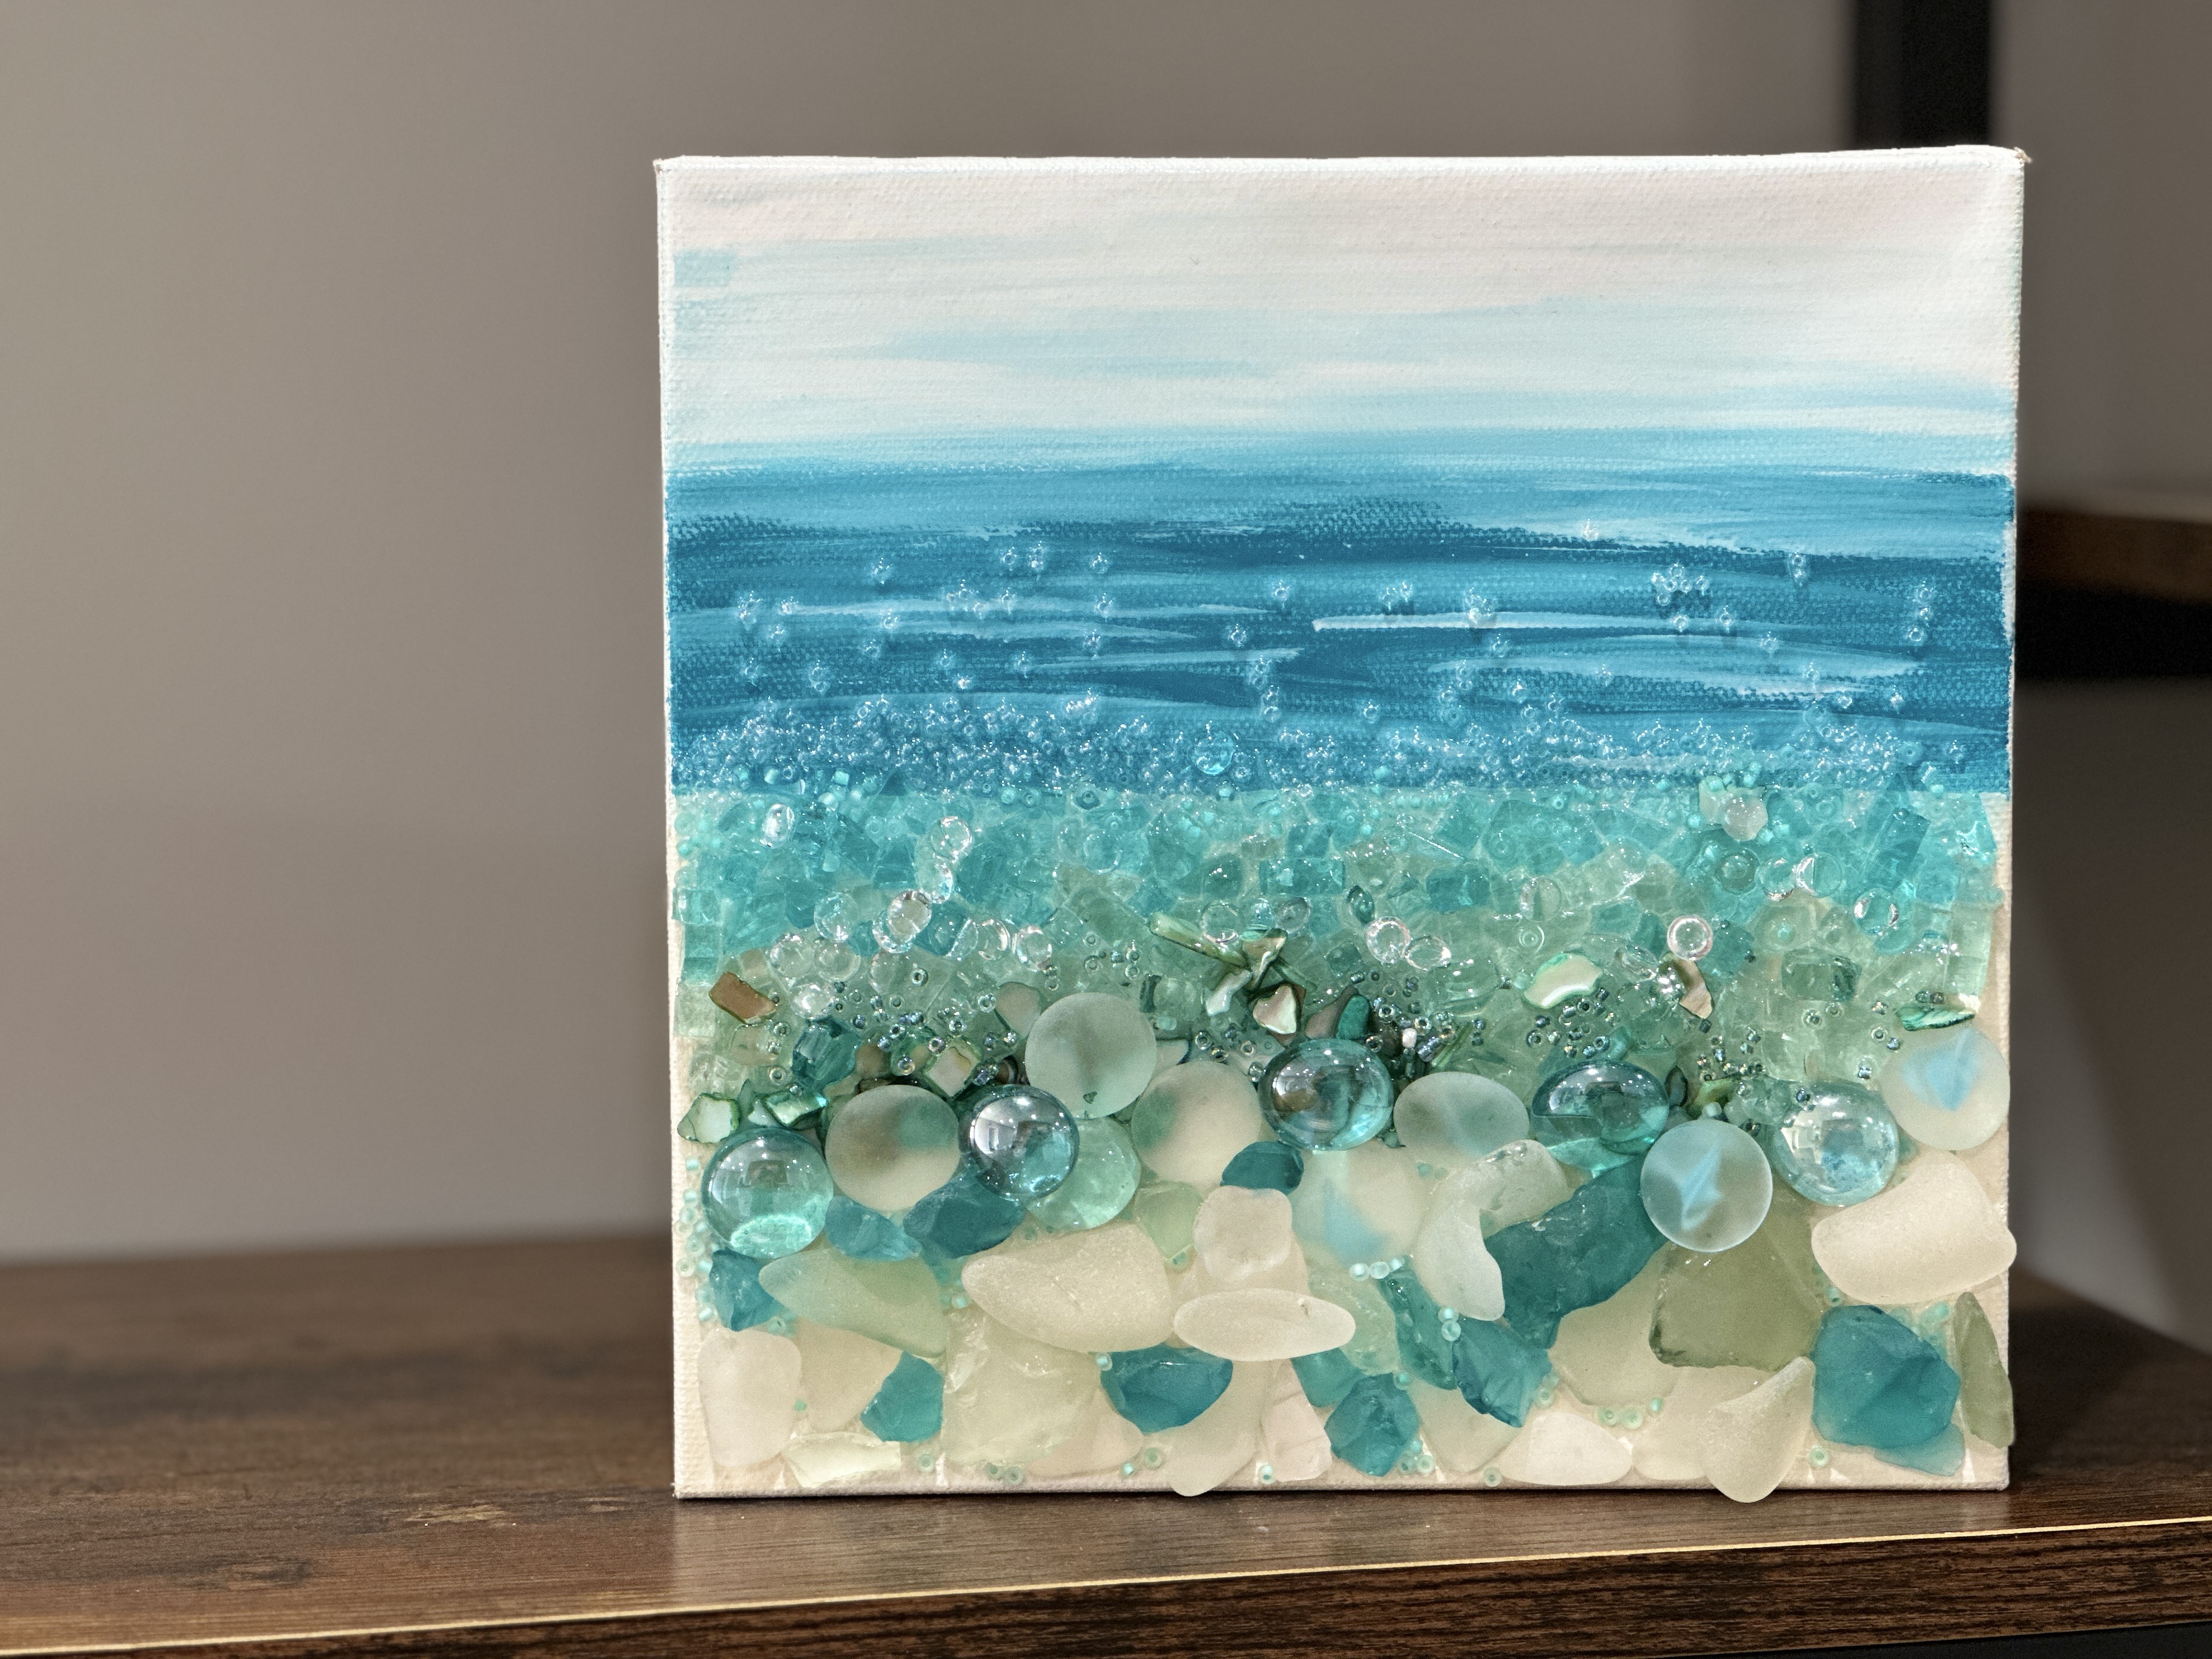
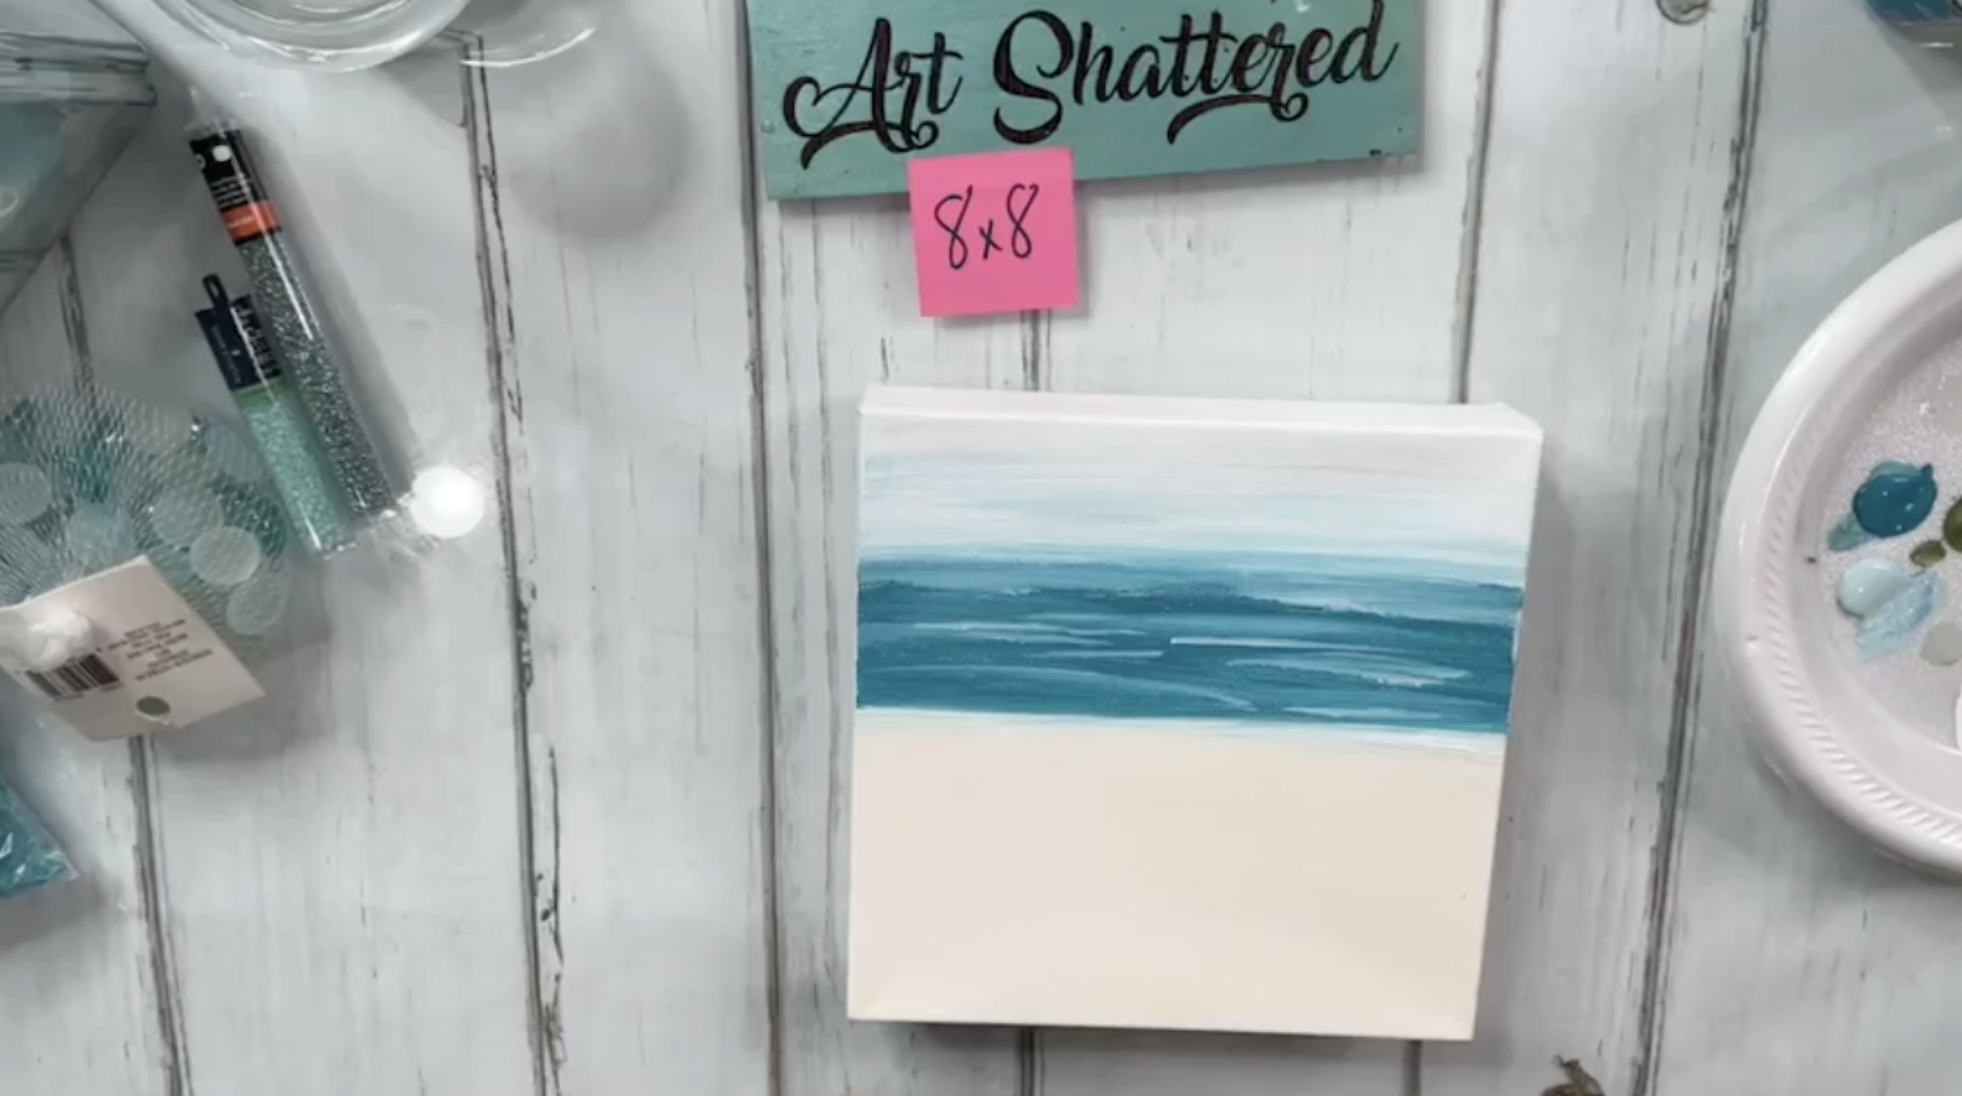
First, I am going to paint a beach background. I am going to paint the lower portion of my canvas with Vintage White for the sand. Then, I'll use Spa Blue, Castaway, and white paint to create my ocean and sky. I'm using Castaway for the ocean and going lighter towards the top of my canvas, blending the colors together. Dry with a heat tool.
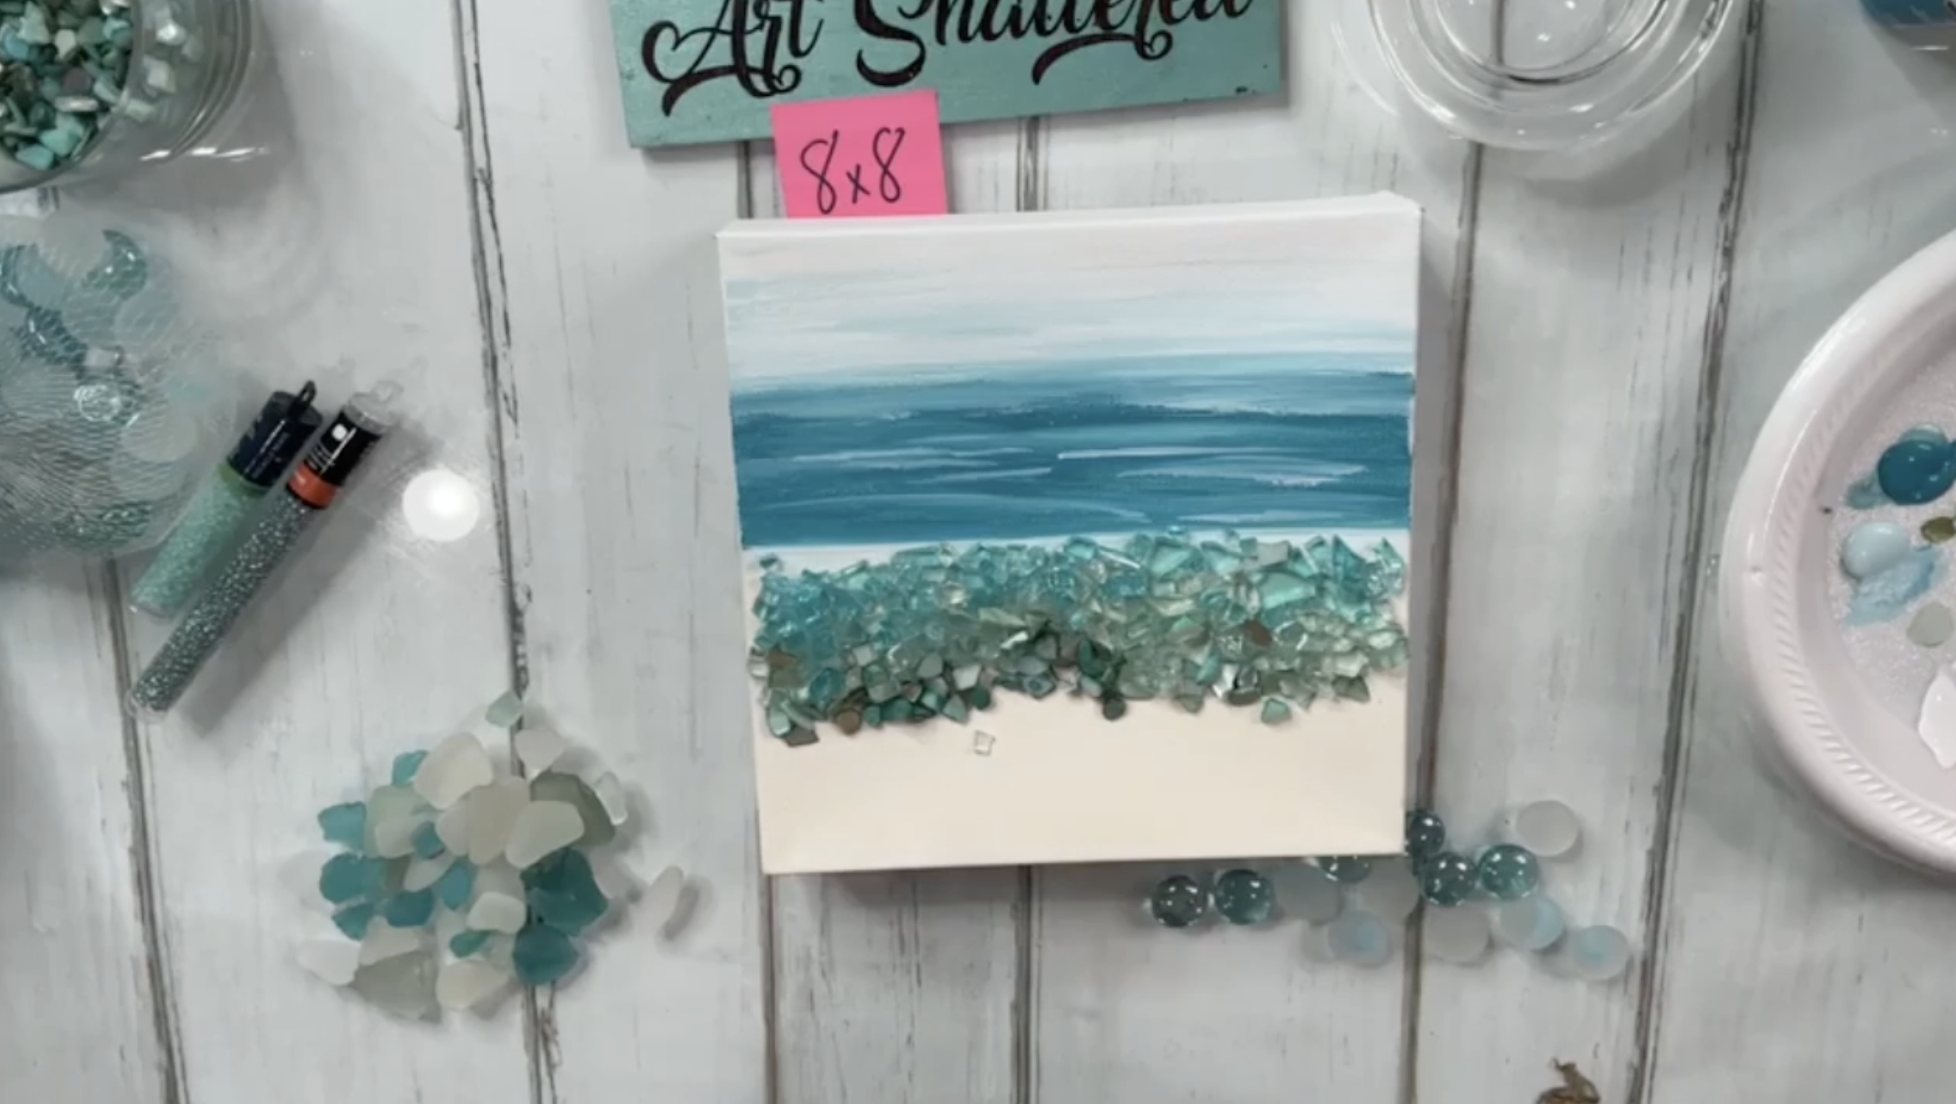
Next, I am going to lay out some of the glass onto my canvas. I am adding the Solex glass, Caribbean Blue glass, and tinted seashells right where my sand and ocean meet. (We will add the rest of the sea glass, seed beads, and other glass after the resin is on)
Next, we'll add resin. We're goin...
Ocean Jellyfish 🌊
I am showing you how to make a beautiful ocean-themed art piece with jellyfish with lots of fun glass embellishments such as acrylic bubbles, crushed glass, clear vitrigraph, and a small glass globe that I broke some pieces from. This one requires a minimal amount of painting and is great for beginners just getting started in glass art!

I am starting by painting my canvas with white paint. Then, I'll add a little bit of Calypso Blue to the background. Next, I'll take some of the blue and some of the white on the very tips of my bristles and create some squiggle lines. Dry with a heat tool.

Place your clear glass globe pieces onto your canvas to determine where each of your jellyfish will be located. Then, take some Metallic White paint, load your paintbrush, and twist and turn it down your canvas to create some tentacles. I'll also mix in some Metallic Teal and use the same technique.
Do the same thing with your second jellyfish, but have your tentacles going in the other direc...
