
Beach Cheese Board 🌊
If you’ve been itching to try your hand at a resin project that’s equal parts fun and functional, a resin cheese board is the perfect place to start. Whether you call it a charcuterie board, snack board, or just a pretty piece of art for your kitchen, this project brings color, texture, and a bit of shimmer to your space. I'm walking you through the exact steps I used to create a gorgeous, layered resin look using just a few supplies and some acrylic paint.
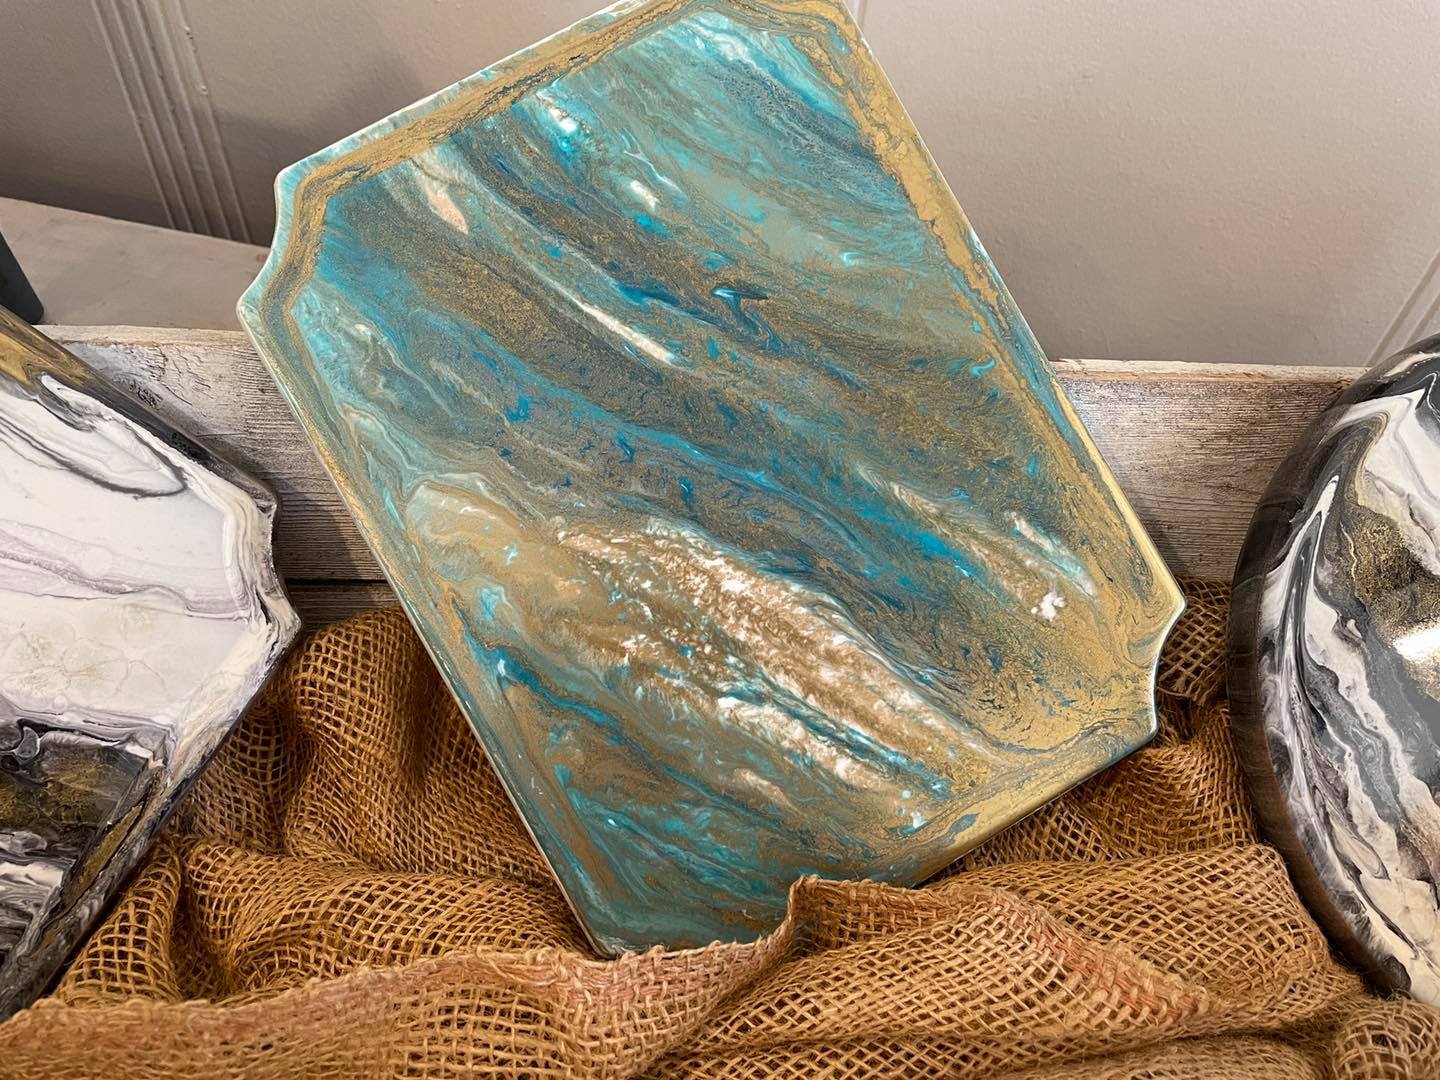
Before anything else, make sure your work surface is completely level. Resin is a self-leveling medium, which means if your table is even slightly tilted, it can cause the resin to pool or run off one side. I used a few popsicle sticks under the legs of my tray to adjust things until it was perfectly level.
With the setup ready, it’s time to mix the resin. For this board, I used a total of 4 ounces—2 ounces of resin and 2 ounces of hardener. Be sure to measure carefully and stir for a full three minutes to ...
Bunny Eyes 🐰
If you’ve been itching to create something playful and springy, the Bunny Eyes project might be just what your creative heart needs! This 8x10 canvas artwork combines simple painting, seed beads, and the cutest sticker glasses – all finished off with resin.
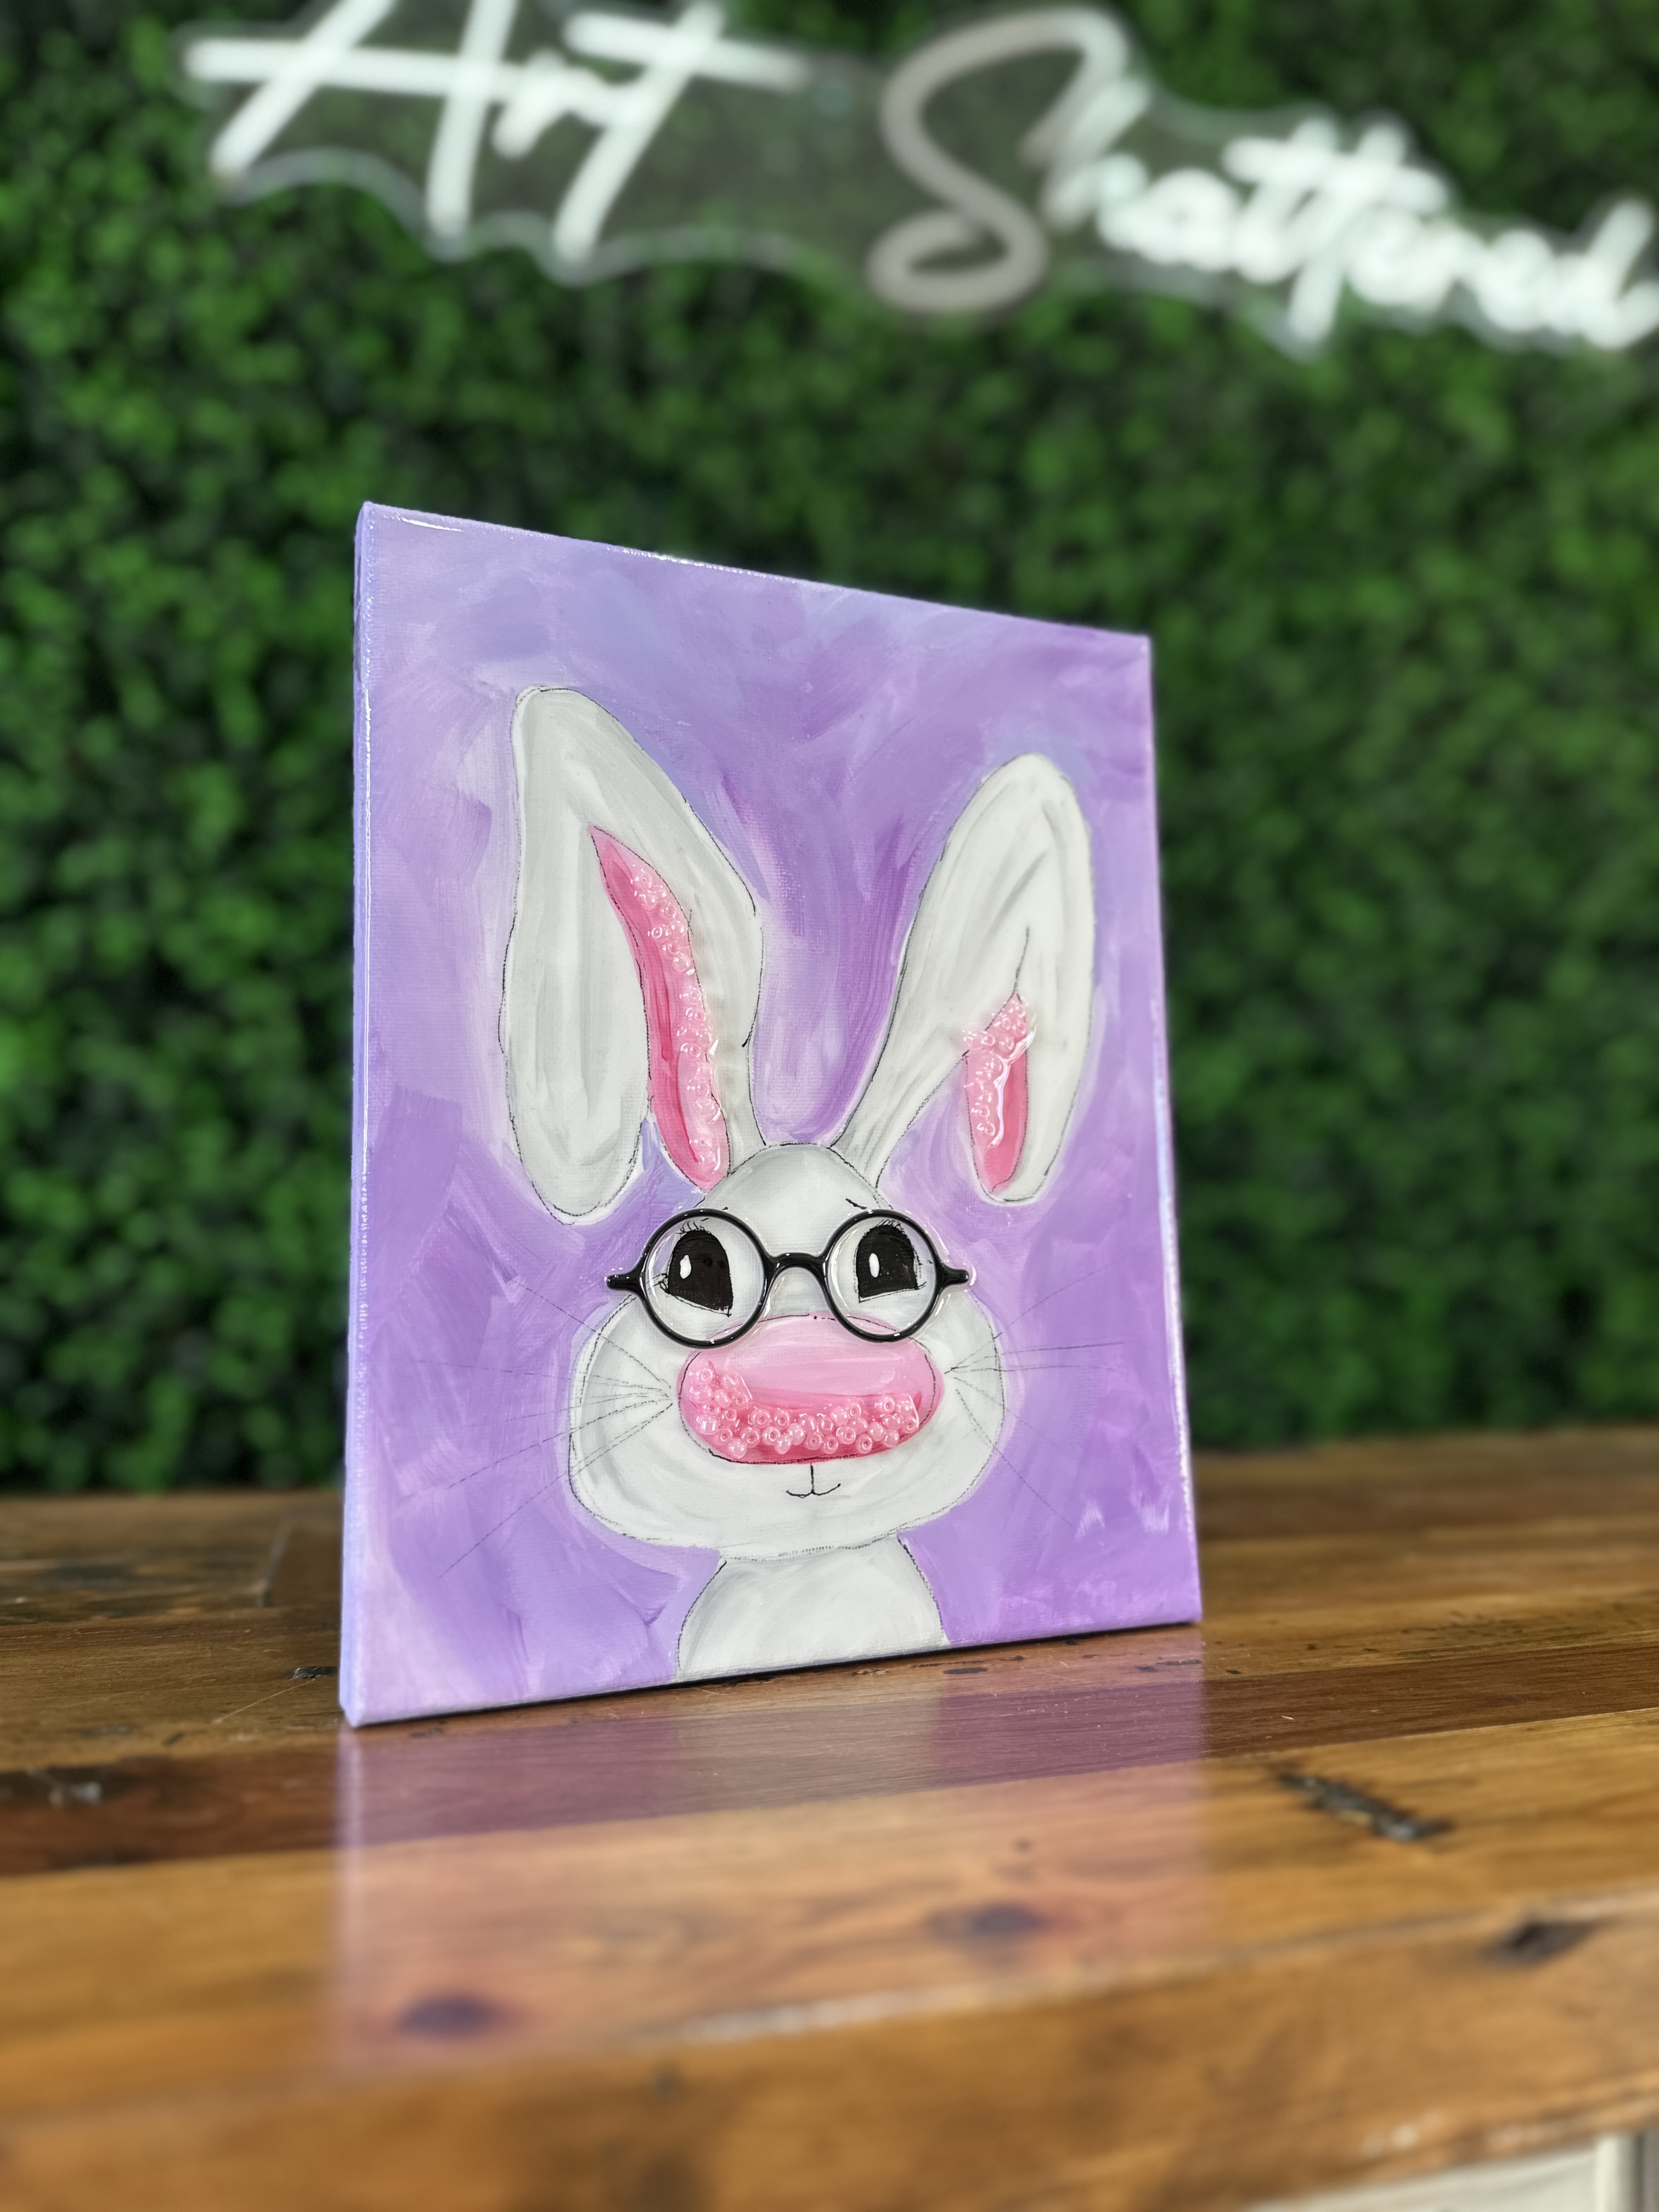
Grab your tracer, tape it to your canvas, place graphite paper underneath, and trace your bunny with a stylus. Leave off the eyes and mouth for now.
Load up your plate with white and just a touch of gray paint (I used Slate Gray, but you can mix white and black too). Start painting your bunny! White can be tricky on white canvas, so the gray helps define shapes like the ears and face. Use an angled brush and blend in tiny hints of gray for shading and movement.
Next, use shades like Poodleskirt Pink, Dragonfruit Pink, and white to paint the inside of the ears and nose. Blend lighter toward the center and darker on the outer edges for a little dimension. Paint the nose with Poodleskirt Pink, adding white to the top and Dragonfr...
Sunflower Love 🌻
There’s something about sunflowers that feels like instant joy - and when you bring one to life using layers of colored glass and shiny resin, it’s pure magic! In this project, I created a sunflower using glass-on-glass techniques, meaning everything is built directly on a piece of clear glass. I'm sharing how to build your flower from cut yellow glass petals, copper glass, mosaic pieces, and a chunky vitrigraph stem.
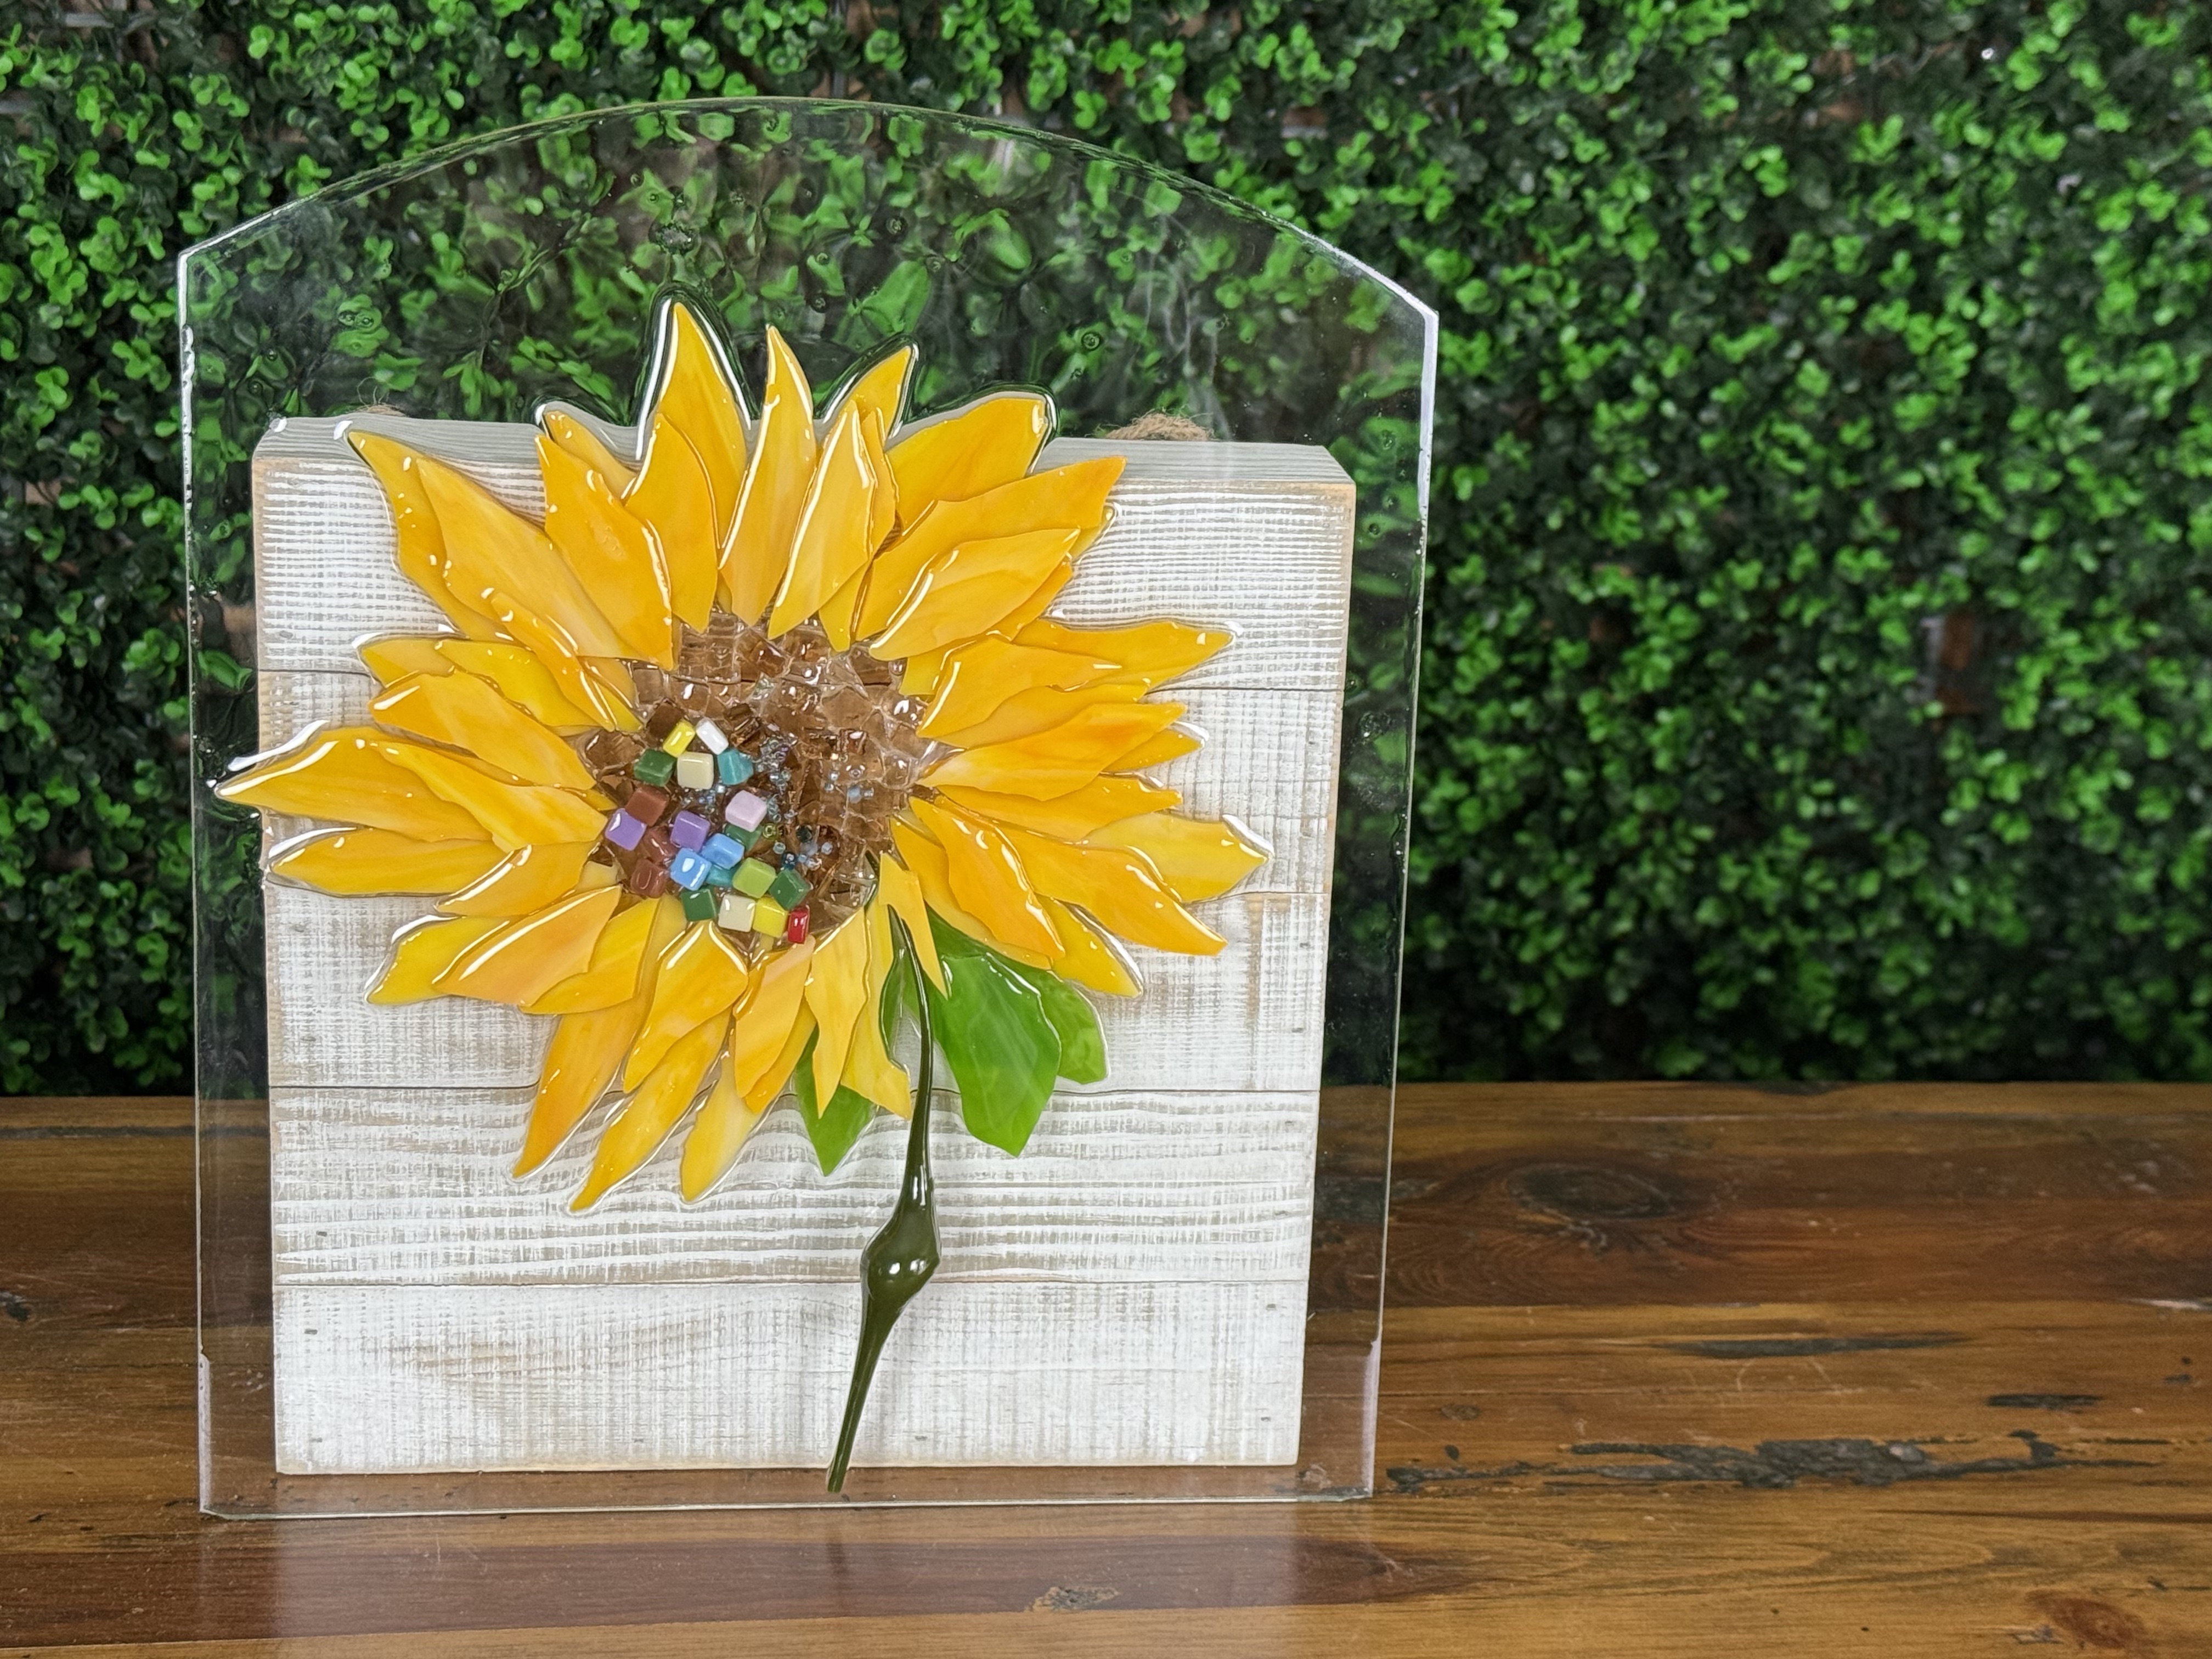
I started with a piece of found glass that likely came from a light fixture, but you can use any piece you have on hand. A frame from the dollar store works just fine - just pop the glass out, and you’re good to go. First things first: clean the glass thoroughly to remove dust and fingerprints. Then, wearing gloves to avoid smudging the surface, flip it over and tape off the back. Taping isn’t essential, but it does make cleanup easier if resin drips. If you skip this step, no worries - a razor blade will scrape it right off once it cures.
Once the base is ready, prep...
Mermaid Scales 🧜♀️
Join me to create this magical and shimmering piece of mermaid art! Using a stencil, acrylic paint, Dragonfly Glaze paint, and crushed glass, you'll create an iridescent masterpiece that glows with color and texture. Follow along with this step-by-step tutorial to bring your own artwork to life!
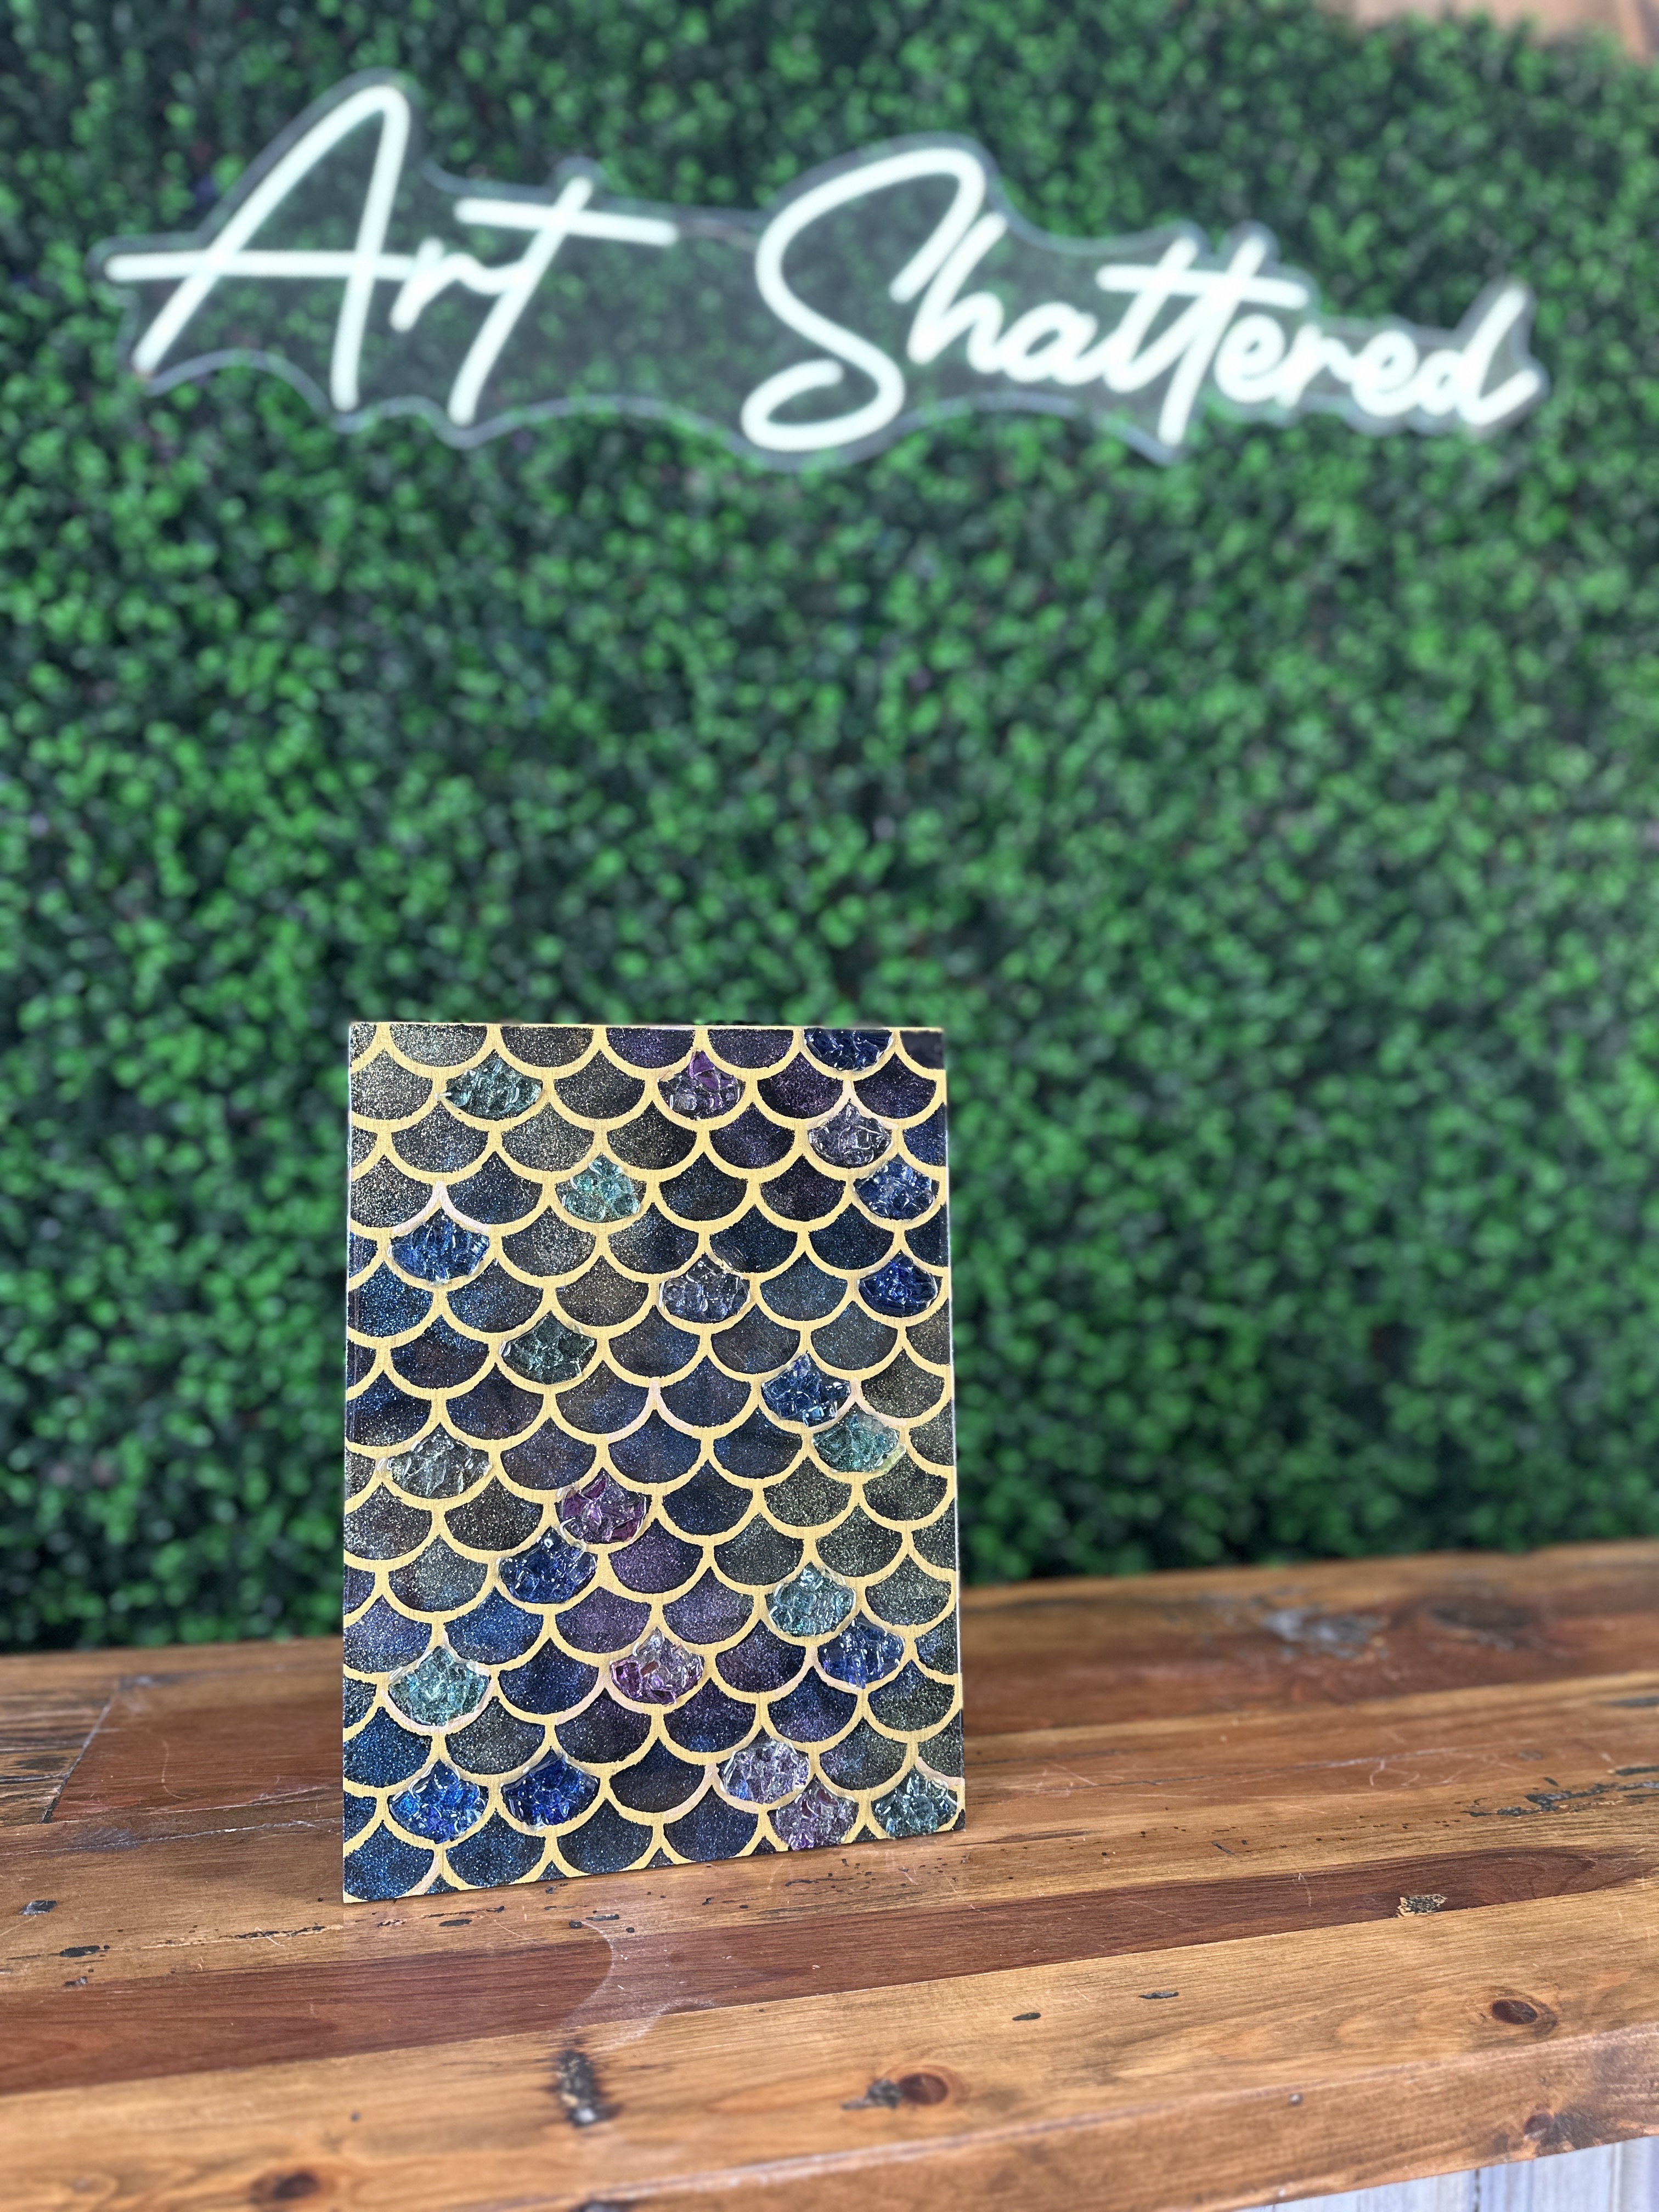
I am using a wooden 9xa2 canvas for this art project. Start by painting the entire canvas (along with the edges) with one coat of black acrylic paint. Once dry, apply two coats of gold paint over the black. This gold layer will show through the stencil design. Let the paint dry completely before moving on to the stenciling process.
Secure your mermaid scale stencil onto the canvas using painter’s tape. Since the stencil is slightly larger than the canvas, you’ll need to stencil in sections.
Using a dauber or stencil brush, lightly dab black acrylic paint over the stencil. Be careful not to overload the brush - offloading excess paint onto a paper towel will help prevent seepage under the s...
FolkArt Dragonfly Glaze Acrylic Paint Product Demonstration 🎨
Recently, I stumbled upon a fascinating product: FolkArt Dragonfly Glaze. It's a color-shifting, glitter-like medium that promises to add a unique sparkle to your artwork. Intrigued, I decided to put it to the test, especially after using it in a recent project within our Shattered Circle community, where we applied it over a dragonfly design.
This isn't your average, run-of-the-mill paint. It's a glaze that reacts differently depending on the background color. That's why I wanted to dive deep and see how it performs over a variety of hues.
I grabbed a canvas and some vibrant acrylic paints, including a set of spring-inspired colors I recently picked up. My goal was simple: to paint sections of different colors and then apply the Dragonfly Glaze over each, showcasing its transformative effect.

We started with a classic black, as it was the base for our dragonfly project and really made the glaze pop. Then, we moved on to:
- Peacock Teal (a personal favorite)
- Metallic Gold
- Citro ...
Leprechaun 🍀
Bring a little luck to your artwork with this festive leprechaun project! With bold colors, shimmering glass accents, and a glossy resin finish, this step-by-step guide will help you create a charming St. Patrick’s Day masterpiece full of texture and sparkle.

Start by painting the background with white acrylic paint and blending in Hauser Green Light, making swishes and strokes in different directions. Dry with a heat tool.

Grab your tracer, tape it to your canvas, place graphite paper underneath, and trace the leprechaun onto your canvas.
Paint the hat with Holly Green, the chin and ears with Warm Beige, and the legs with White. Use Milk Chocolate for the beard, and complete the look by painting the hat ribbon and shoes with Black. Dry with a heat tool.

Now, let’s bring depth and dimension to your leprechaun with shadows and highlights! Start by applying a second coat of Holly Green to the hat. Blend black paint along the top and right side for shadows, and add white paint ...
How to Fix Sticky Resin on Your Artwork 🎨
Sticky resin is a frustrating problem that many crafters and artists face. After spending hours creating a beautiful piece, you expect your resin to harden to a smooth finish. But what happens when it’s still tacky after several days? There are ways to troubleshoot and fix this problem. Let's break it down and figure out how to get your resin curing like it should.
Why Is My Resin Sticky?
The most common reason resin stays sticky is improper mixing or the curing conditions not being ideal. Resin is a chemical process that requires the right balance, the right temperature, and the right amount of time to set. If any of these factors are off, the resin won't cure properly, leading to a tacky finish.
How to Fix Sticky Resin
Check the Mixing Ratio - The most important part of working with resin is ensuring that the resin and hardener are mixed in the correct proportions. Most resins require a 1:1 ratio, but be sure to double-check your product instructions. An incorrect ratio can resul...
Pink and Gold Heart 💛
Create a stunning 4x4 pink and gold heart shelf sitter canvas that’s perfect for gifting or adding a touch of charm to your space! This project combines textured palette knife painting, rich acrylic colors, and sparkly seed beads to bring your heart to life. With layers of pinks and metallic gold, you’ll craft a piece that’s full of dimension and personality.

Begin by applying Liquitex Basics Iridescent White to your canvas using a palette knife, adding texture and depth with each stroke. For a more dimensional look, you can extend the paint onto the edges of the canvas as well.
Next, let’s shape the heart using the same Iridescent White and a paddle palette knife, which has a wider blade and a curved top. Load your knife with paint, press down, and sweep it towards the bottom of the canvas to form the two sides of the heart. Don't worry about perfection—embrace the organic, textured feel!
Using the same palette knife, swipe Masters Touch Acrylic Pink, Masters Touch Acrylic Purple...
XOXO Heart 💗
Let's create a stunning heart painting that shimmers with color and texture! This project combines bold reds and pinks, soft blended backgrounds, and sparkling glass accents to bring your artwork to life. Whether you're making it for Valentine’s Day or just want to add a little extra love to your decor, this step-by-step tutorial will guide you through the process.

Grab your tracer, tape it to your canvas, place graphite paper underneath, and trace your heart with a stylus.
Next, we'll work on painting our heart. I'm going to start by painting one half of the heart with Cherry Red, the middle of the heart with Dragonfruit Pink, and the other half of the heart with Poodleskirt Pink and white to create a blended ombre effect on the heart. Dry with a heat tool. Add a second coat using the same technique and dry again.

Then, I’ll add some gold accents around the edges of the heart using Dazzling Metallics Splendid Gold. For the background, I’ll start with white paint and blend in L...
Valentine Art 💛
Celebrate love this Valentine’s Day with a beautiful heart and wings canvas! This project combines rich metallic gold tones with sculpted texture to create a stunning, dimensional piece. Whether you're making it for yourself or as a gift, this artwork is a perfect way to add warmth to your space.

Begin by applying a coat of Metallic White paint to your 12x12 canvas, ensuring smooth, even coverage by pulling the paint in one direction. This helps the metallic finish lay flat and reflective. Dry with a heat tool.
Next, secure your tracer to the canvas, place graphite paper underneath, and use a stylus to trace the heart and wings.
For the heart, apply a layer of Metallic Antique Gold paint. Then, for the wings, use a heavy-bodied paint like Master's Touch Antique Gold. Dip the back of a palette knife into the paint, start at the tips of the wings, and pull the paint downward to create texture and movement. Continue layering and sculpting the wings, blending some of the paint onto th...
